
DNC
Posted by Elizabeth Hamilton on Sep 4th 2012
Here in North Carolina, everyone is being whipped into a frenzy over preparations for the upcoming Democratic National Convention. Let me just say that our roads downtown (or as we call it...Uptown) will be extremely well paved!
I'm electioned out, so I'd rather share my version of DNC with you...
De-stressing ’N’ Coloring
 It's no secret that I know my way around a Sharpie. Throughout school, any backpack that wasn't already black, fell victim to pens. Even as an adult, when I thought my snowboard bag was just too drab, I whipped out Sharpies and alcohol ink pens and gussied it up a bit.
I like coloring jewelry as well, and for many applications Sharpie Cloisonne is much faster, easier, and definitely less scrubbing (pickling and scrubbing-Blah) than kiln or torch fired enamel. And I can promise you that you'll never over or under fire Sharpie.
 To get the best results, I've found that findings, etc. with a slightly rough or raw texture work best. I like to use a little fingernail polish remover on a paper towel to wipe down the surface and remove any vintage grime lurking about.
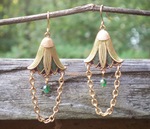
In these earrings the ridges on the stampings are much closer together in the tiny recesses than on the main petals. Keep traditional color-mixing rules in mind...The wash on the petals is from a light blue alchohol pen; the brass showing through gives you green. The more saturated areas are Sharpie.
 The rougher texture on these stampings is more forgiving for Sharpies, which tend to streak if you go over your marks on high areas. Sharpies are also more opaque than alcohol ink pens, but they are still somewhat translucent.
Once I've finished adding color, I seal them. I've had good luck with Glossy Accents, but it feels a little gummy when you pick at it, so my sealer of choice is clear Rustoleum topcoat spray. All you need are a few light passes, if you get to the dripping point it will smear your colors.
 Using pens can be tedious if you want to color up a batch of beads.
Instead of fingernail polish remover (oh, and I use the hard stuff, no acetone-free for me!), these beads got a bath in a submerged colander in dishwashing detergent. The colander -a sieve would work well too- makes the beads easy to manage in the sink, and they drain just like pasta.
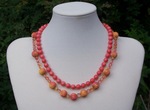
I used 14 gauge aluminum wire to string a bunch of my brass-colored corrugated beads for spray painting. A few very light coats of yellow went on first, and then a very light dusting of hot pink. My unsteady hand speed provides some natural variation in the coloring.
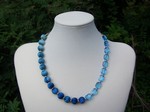 The corrugated beads for this necklace were sprayed with matte white, then sanded just a little, and then dipped in alcohol ink.
Since I was aiming for some gradation, I put about 4 drops of blue ink, and 2 drops of green in a tiny disposable cup. I set out a pile of paper towels, and plopped in a few beads and swished them around in the ink. Then set them on a pillow of paper towels to dry. Next I added some drops of blender/color extender to the cup, added another few beads and repeated the process. Each round, I diluted the color further.

I felt that the beads needed a little more distressing to contrast with the sleek Swarovski crystals, so I used a drop of clean up solution on each bead, and then allowed them to dry. Once dry, I headed back outside for a matte topcoat.
I hope that you have as much fun experimenting with coloring your supplies as I do. So get out there in these last few days of summer and go